View on GitHub
在线编辑器
在线编辑器说明
本页面说明如何使用我们的 在线编辑器。
对于每个问题和拉取请求,都应使用在线编辑器!
如何登录
登录非常简单,只需在右上角按下 使用 GitHub 登录 按钮,然后通过 GitHub 登录。
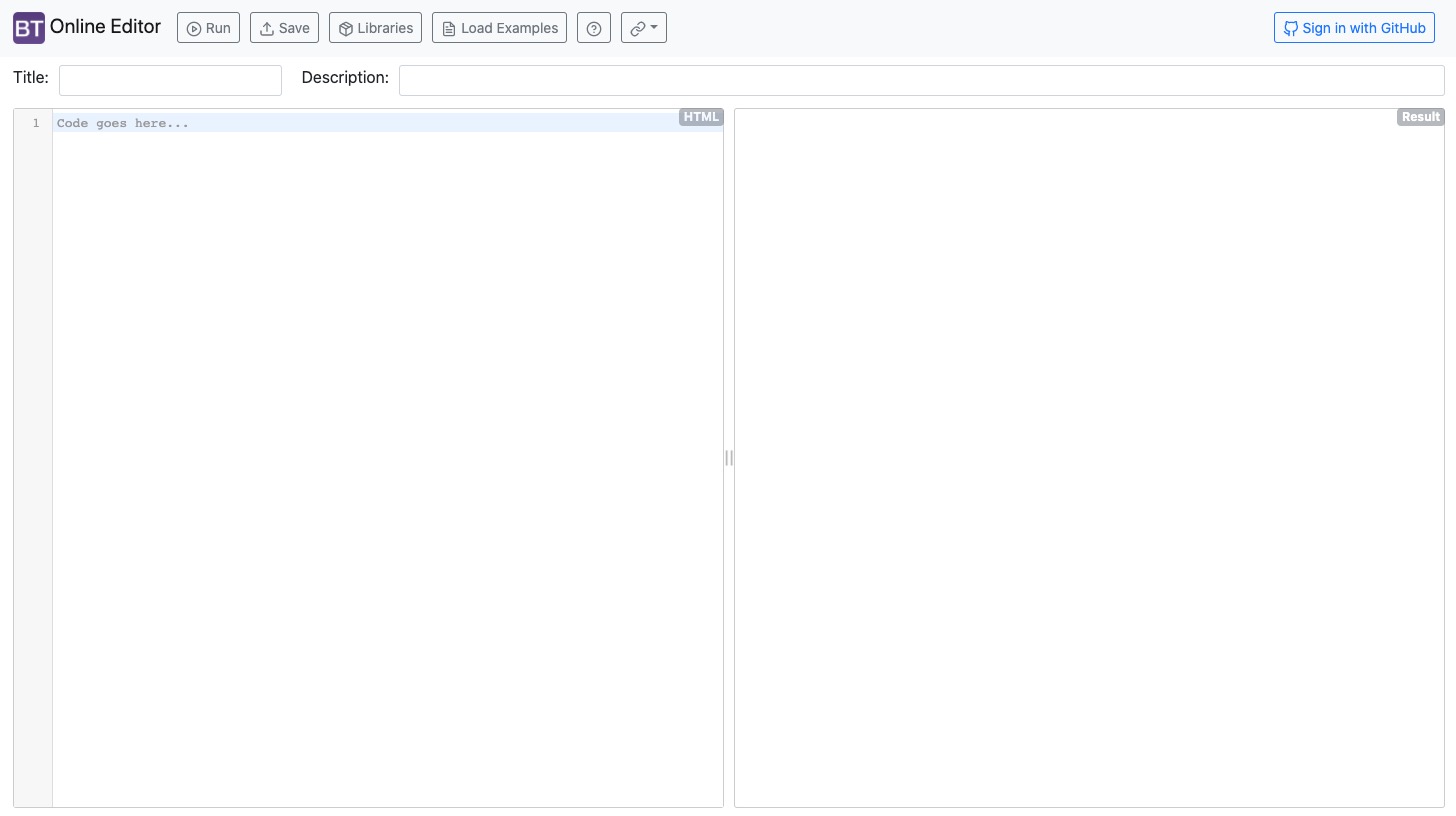
基本功能和页面结构
我们的在线编辑器旨在为 bootstrap-table 创建简单的示例/演示。
页面结构如下:
顶部导航栏
我们有 5 个按钮:
- 运行:运行按钮显示您的示例的当前版本。
- 保存:保存按钮保存您的示例。按下保存后,URL 将会改变,例如
https://live.bootstrap-table.com/code/<用户名>/<ID>。 - 库:此按钮将打开配置页面。在此页面上,您可以配置示例的环境:
- Bootstrap Table 源:此选项定义应使用哪个版本的源(CDN 或 GitHub 源)。如果选择
从 GitHub 源,您可以设置将用于示例的分支。对于问题,通常始终使用从已发布的 CDN。 - 发布的 CDN 版本:在这里您可以选择 bootstrap-table 的版本,以便为旧版本创建示例。
- 主题:在这里您可以选择我们支持的主题,例如展示特定主题的问题。
- 扩展:如果您解释要使用扩展,可以在此轻松选择。这意味着您不必自己在示例中包含它!
- Bootstrap Table 源:此选项定义应使用哪个版本的源(CDN 或 GitHub 源)。如果选择
- 加载示例:此选项打开一个页面,您可以在此加载现有示例(它是我们示例页面的”镜像”)。
- 链接:最后一个按钮包含一些链接,例如到我们的网站、GitHub 页面等。
左侧
您可以在此编写示例。包括 HTML、CSS 和 JavaScript(CSS 和 JavaScript 需要 <style></style> 和/或 <script></script> 标签!)
基本模板是:
<!-- 包含自定义 css 和 js 文件 -->
<link rel="stylesheet" href="https://example.com/custom.css">
<script src="https://example.com/custom.js"></script>

<!-- 定义自定义样式 -->
<style>
</style>

<!-- 无需编写 <html> 和 <body> 标签 -->
<table id="table">
</table>

<script>
  $(function () {
    $('#table').bootstrapTable()
  })
</script>
注意:您需要将初始化函数放在 $(function () {}) 中,以确保 jquery 和 bootstrap-table 已加载。
右侧
您可以看到正在运行的示例(按下运行按钮后)。
您还可以点击结果(全屏)切换运行示例的全屏模式。
问题工作流
每个问题都应包含一个在 在线编辑器 上创建的示例。
- 打开在线编辑器。
- 转到库页面并配置示例环境。
- 版本
- 主题
- 扩展
- 编写您的示例(或从本地项目复制)。
- 检查是否可以在示例中重现您的问题。
- 保存示例(按保存按钮)并复制 URL。
- 打开问题并附上示例的 URL。
(您也可以使用加载示例按钮加载现有示例,而不是步骤 2 和 3)。
拉取请求工作流
拉取请求的工作流与问题的工作流非常相似。
唯一的区别是您必须选择您的分支(编辑器将使用您的代码创建示例)。为此,您必须打开库页面,在 Bootstrap Table 源 选项上选择 从 GitHub 源,并在 GitHub 源分支 输入框中写入您的分支名称。
分支名称的语法是 <用户名>:<分支>。您也可以从拉取请求页面复制该字符串。
